

Make rich, collagen chicken bone broth in your Instant Pot! Easy, hands-off, and guaranteed to turn into a nourishing jelly when chilled.

I’m low-key obsessed with collagen chicken bone broth. It’s nourishing, soothing, and let’s be real… if there’s even a tiny chance it helps with my skin, I’m in. Plus, it’s delicious. But standing over a pot for 4–6 hours? Not my vibe.
Enter: my Instant Pot.
That’s why the Instant Pot changed everything for me. Once I got mine, I knew I had to try making bone broth in it… and now I never do it any other way!
I love having a container of homemade bone broth tucked away in my fridge or freezer, ready for whenever I need instant soup, a delicious nourishing base for noodles and congee, or adding a splash of quick flavour to stir-fries and sauces.
This instant pot broth is ridiculously easy to make, super hands-off, and yes, it always turns into jelly once chilled. That’s the good stuff. That’s collagen magic, baby.
Table of Contents
- What is Collagen Chicken Bone Broth?
- Why You’ll Love This Recipe
- Key Ingredients & Best Chicken Parts to Use
- Key Equipment: The Instant Pot
- How to Make Collagen Chicken Bone Broth
- How to Make It (Stovetop)
- How to Use and Serve
- Tips and Tricks
- Storage and Reheating
- More Recipes Like This
What is Collagen Chicken Bone Broth?
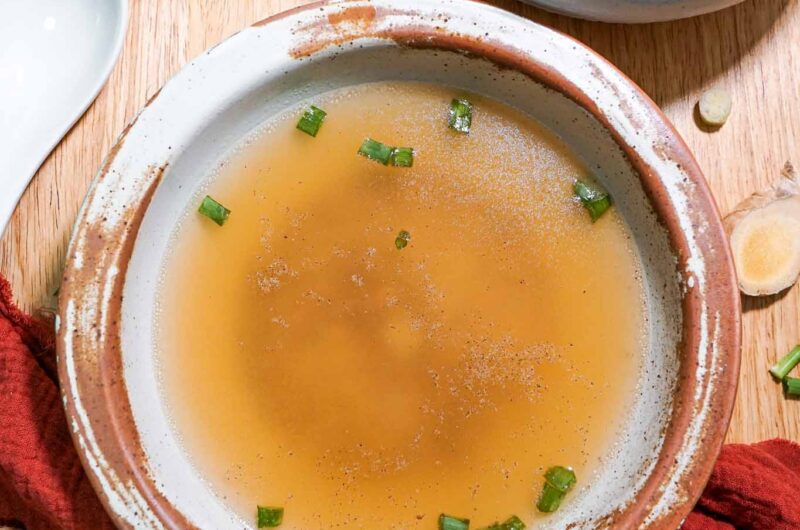
Collagen chicken bone broth is a deeply flavourful, slow-simmered stock made from chicken bones, especially the ones rich in cartilage like chicken feet, wings, necks, and backs.
When simmered low and slow (or pressure cooked in an Instant Pot!), all that collagen gets pulled out into the broth, making it naturally thick, glossy, and incredibly nourishing.
It’s the kind of broth that solidifies into a jiggly jelly when cold, and melts into pure liquid gold when heated. Whether you sip it straight or use it to elevate soups, noodles, and sauces, it’s pure comfort in a bowl! I use this in place of chicken stock for that instant rich flavour.
Why You’ll Love This Recipe
- High in collagen: That natural jelly texture = proof of a good collagen pull. Great for skin, joints, and gut health.
- Easy and hands-off: The Instant Pot takes care of everything. No babysitting required.
- Budget-friendly: Uses affordable cuts and bones that would otherwise be discarded.
- Flavour-packed: Rich, savoury, and versatile! Tastes amazing on its own or in recipes.
- Freezer-friendly: Make a big batch and freeze in portions to use anytime.
Key Ingredients & Best Chicken Parts to Use
To make a truly collagen-rich broth, it’s all about the bones and cartilage.
I’m lucky enough to live near a local wet market (though truthfully, I still shop at the supermarket or order groceries online most days – no shame in that!).
But every now and then, I stop by my butcher’s stall and spot a tray of chicken feet and bones sitting out—and I just know it’s bone broth time.
Sometimes, even when I have no intention of making collagen broth, my butcher will look at me and go, “Today you don’t want chicken feet?” And somehow… I always leave with a pack. If you’re wondering: yes, chicken feet freeze beautifully, so you can stash them away for your next bone broth session. So if your butcher doesn’t have fresh feet, definitely ask if they’ve got frozen ones tucked away. They work just as well!
Here’s what you want to look for:
Best Chicken Parts to Use:
- Chicken feet: the secret weapon. Packed with collagen and gelatin.
- Cartilage-rich joints: anything bendy or with skin is your friend.
- Necks, backs, and carcasses: basically the bony parts with not much meat on that you don’t really want to eat. great for flavour and still collagen-rich.
- Wings and wing tips: lots of connective tissue = good gelatin.
- Drumsticks: adds a bit of meatiness to the broth.
💡 Tip: If your butcher doesn’t have fresh chicken feet, ask if they have frozen ones! They work just as well, and you can stash them in your freezer until you’re ready to make broth.
Can I use chicken meat?
Of course, but why waste the good meat for this? Chicken parts, bones are the best things to use for bone (hello!) broth.
Plus you need A LOT of chicken parts to make good broth, chicken feet and bones are cheap!
Additions (optional but lovely):
- Aromatics: Onion, garlic, and ginger
- Vegetables: Carrots, because I always have this in my fridge. Adds a tinge of sweet flavour to the broth.
- Aromatics scraps such as cilantro roots or scallion ends
- Pinch of salt: A good pinch of salt helps to bring out a hint of initial flavour and adds some minerals to the broth. You’re not adding a lot to properly season – you will still need to season the broth adequately before serving.
- Apple cider vinegar (helps extract collagen): If I’m using just chicken feet, I do not need to add the vinegar. I find this works best for bones to pull out the collagen first, but you can also just leave it pressure cooking for longer. You just need a couple tablespoons – definitely not enough to flavour the broth.
Key Equipment: The Instant Pot
This recipe is Instant Pot gold. Traditional bone broth takes at least 4 to 6 hours on the stovetop to coax out all that glorious collagen, but with the Instant Pot, you get the same rich, jiggly results in just a fraction of the time.
I use the “Soup/Broth” setting and cook it for 2 to 3 hours under pressure with a natural release.
It’s completely hands-off once you’ve loaded everything in, and you don’t have to babysit the stove or worry about your pot boiling over.
This is the exact Instant Pot model that II’m using:
Any pressure cooker should work, but adjust the setting or mode accordingly. If the pressure cooker has a ‘soup’ or ‘broth’ function, select it. If yours has adjustable pressure levels, use low pressure for the clearest broth. Otherwise, regular pressure will work just fine.
How to Make Collagen Chicken Bone Broth
1. Prep the ingredients:

- Give the chicken feet and bones a good rinse. If you prefer, you can snip off the nails using kitchen scissors (I always just skip this step).
- Roughly chop the onion in half, smash the garlic cloves, and slice the ginger into coins. No need to peel the aromatics.
- Roughly chop the carrot into large chunks.
- If using, gather your aromatics scraps like cilantro roots or spring onion ends. I usually have these in a little baggy in my freezer, ready for times like this. Don’t worry if you don’t have them, the broth will still be delicious.
- Add all the ingredients into the Instant Pot.
2. Add to Pot:

- Add the chicken feet and bones in the pot, try to layer to maximise space.
- Add the rest of the ingredients in, along with salt.
- Pour in water, just enough to barely cover the bones. It’s okay if some bits stick out slightly. Less water = more intense collagen extraction.
- Stir in salt.
- OPTIONAL: Stir in apple cider vinegar. Let the mixture sit for 30 minutes before turning on the Instant Pot. This step helps the vinegar start pulling out all the good stuff from the bones and feet.
NOTE: If I’m doing this step, I usually let soak while I prepare the aromatics for efficiency.
3. Pressure cook the broth:

- Close the lid, set your Instant Pot to Soup/Broth Mode or Manual on Low Pressure (if available), and set the timer for 2–3 hours.
- I recommend 3 hours for max collagen extraction — totally worth it if you have the time.
- Once the cooking is done, let it natural release pressure for at least 10 minutes. I usually let it naturally release pressure until the valve drops, only because I don’t want to have any pressure splatter to clean up after!
4. Strain and cool:

- Remove the larger bones and aromatics with a slotted spoon first.
- Carefully strain the broth through a fine mesh strainer into a heat-safe container or bowl.
- Let it cool slightly at room temperature before transferring to the fridge. Once chilled, it should jiggle like jelly. This is a good sign that you’ve pulled out tons of collagen!

- OPTIONAL: Once cool, there will be a layer of solidified fat above the broth. Skim off the fat when cooled. The fat is flavour though! So unless I’m planning to keep it for a long while, I don’t skim it off.
5. Store and use:
- Store the broth in containers that are easy to stack in the fridge or freezer. It keeps in the fridge for up to 5 days, and in the freezer for up to 3 months.
- I like keeping one jar in the fridge for easy weeknight soups, while the rest go into the freezer for future dishes.
How to Make It (Stovetop)
“Hmm, I really want to make this, but I don’t have an instant pot. How?”
No problem! It’s pretty much the same steps (except optionally step 2 and step 4), but extend the time to a whopping 6-8 hours. YUP. That long, for full collagen extraction.
1. Prep your ingredients.
- The ingredient step is the same as above.
2. Blanch the bones (optional but recommended).
With a pressure cooker, we skip this step. But if making this over the stovetop, I highly recommend this for a cleaner-tasting broth.
- Bring a large pot of water to a boil, then add the chicken bones and feet. Let them boil for 5 minutes.
- Drain and rinse the bones under cold water to remove scum and impurities.
- Wipe out the pot to remove any residue.
3. Build your broth.
- Return the bones to the clean pot. Add all the aromatics.
- Fill with enough water to just cover the bones. Stir in salt.
- Add apple cider vinegar if using, and let the mixture sit for 20–30 minutes before heating. This helps extract the collagen.
4. Simmer low and slow.
- Bring the pot to a boil, then immediately reduce the heat to low. The lowest your stovetop can manage!
- Cover partially with a lid and let it simmer gently for 8–12 hours. Yes, that long! The longer it cooks, the richer the broth.
- Occasionally return to check on the pot, and skim off the scum. Make sure to top up with water if too much evaporates. You want the bones to stay mostly submerged.
5. Strain and cool.
- Once done, the steps are the same as the instant pot step: discard the solids, strain the broth through a fine mesh sieve into a heat-safe container, let cool slightly before transferring to the fridge.
How to Use and Serve
This broth is a game-changer for everyday cooking too. Here are just some of the ways I like to use it:
- Sipped warm on its own for a cozy, nourishing collagen boost (especially when I’m feeling under the weather or need a little self-care). Just scoop into a bowl, heat it in the microwave, season with salt and pepper, and done!
- As a healthier stock cube replacement: I add it to soups, stews, sauces, and anything that calls for chicken stock. No additives, just flavour.
- As a base for chicken noodle soup, congee/porridge, or ramen. It instantly levels up whatever soup you’re making! If the flavour is too intense, simply top up with water to dilute.
- For cooking rice: use it in place of water to infuse your rice, or any other grain of choice with savoury goodness. If the chicken flavour is too intense, top up with water to dilute.
- Stirred into sauces or gravies in recipes such as mapo tofu or ayam masak kicap, to deepen the flavour and add that cooked-for-hours taste in just minutes.
- Used in braises, stews, or even hot pot. It makes your pot extra aromatic and adds so much body to the broth.
- For easy soups! If the broth feels too intense on its own, just Top up with water to mellow out the intensity, season to your taste and instant soup is ready!
It’s super versatile, freezes beautifully, and adds that homemade, soul-warming quality to any dish. If you’re into meal prepping or just want to cook more mindfully, I can’t recommend this enough.
Tips and Tricks
- Want a clearer broth? Give the bones a quick parboil and rinse before pressure cooking.
- Want better flavour? Roast the bones first for a deeper, more roasted flavour.
- No Instant Pot? You can use a slow cooker (10–12 hours) or simmer gently on the stovetop for 4–6 hours.
Storage and Reheating
This broth stores beautifully and is a great one to make in bulk.
- In the fridge: Keeps for 5–7 days. Store in airtight containers.
- In the freezer: Freeze in 1–2 cup portions. Keeps up to 3 months.
- Reheating: Gently reheat on the stove or in the microwave until it melts into a golden liquid.
Instant Pot Collagen Chicken Bone Broth (Guaranteed to Turn to Jelly!)
4
servings15
minutes2
hoursKeep the screen of your device on
Ingredients
500 g (1.1 lb) chicken feet, cleaned
500 g (1.1 lb) chicken bones (preferably with cartilage like backbones, necks, wing tips, etc.)
1 medium onion, halved
4 garlic cloves, smashed
1 thumb-sized piece of ginger, sliced into coins
1 large carrot, cut into large chunks
aromatics scraps (optional, like cilantro roots, spring onion ends)
2 tsp salt
2 tbsp apple cider vinegar (optional)
2 liters (8 cups) water, or enough to just cover the bones
Directions
- 1. Prep the ingredients:
- Give the chicken feet and bones a good rinse. If you prefer, you can snip off the nails using kitchen scissors (I typically skip).
- Roughly chop the onion in half, smash the garlic cloves, and slice the ginger into coins. No need to peel the aromatics. Roughly chop the carrot into large chunks. If using, gather your aromatics scraps like cilantro roots or spring onion ends.
- 2. Add to Pot:
- Add the chicken feet and bones in the pot, try to layer to maximise space.
- Add the rest of the ingredients in.
- Pour in water, just enough to barely cover the bones. It’s okay if some bits stick out slightly. Less water = more intense collagen extraction.
- Stir in salt.
Option: Stir in apple cider vinegar. Let the mixture sit for 30 minutes before turning on the Instant Pot. This step helps the vinegar start pulling out all the good stuff from the bones and feet. If I’m adding it, I usually let soak while I prepare the aromatics for efficiency. - 3. Pressure cook the broth:
- Close the lid, set your Instant Pot to Soup/Broth Mode or Manual on Low Pressure (if available), and set the timer for 2–3 hours.
- Once the cooking is done, let it natural release pressure for at least 10 minutes. I usually let it naturally release pressure until the valve fully drops, only because I don’t want to have any pressure splatter to clean up after!
- 4. Strain and cool:
- Remove all of the bones and larger solids with a slotted spoon first. Then carefully strain the broth through a fine mesh strainer into a heat-safe container or bowl for a clearer broth.
- Let it cool slightly at room temperature before transferring to the fridge. Once chilled, it should jiggle like jelly.
- 5. Store and use:
- Store the broth in containers that are easy to stack in the fridge or freezer. It keeps in the fridge for up to 5 days, and in the freezer for up to 3 months.
Did you make this recipe?
Tag @nomadetteats on Instagram


)