

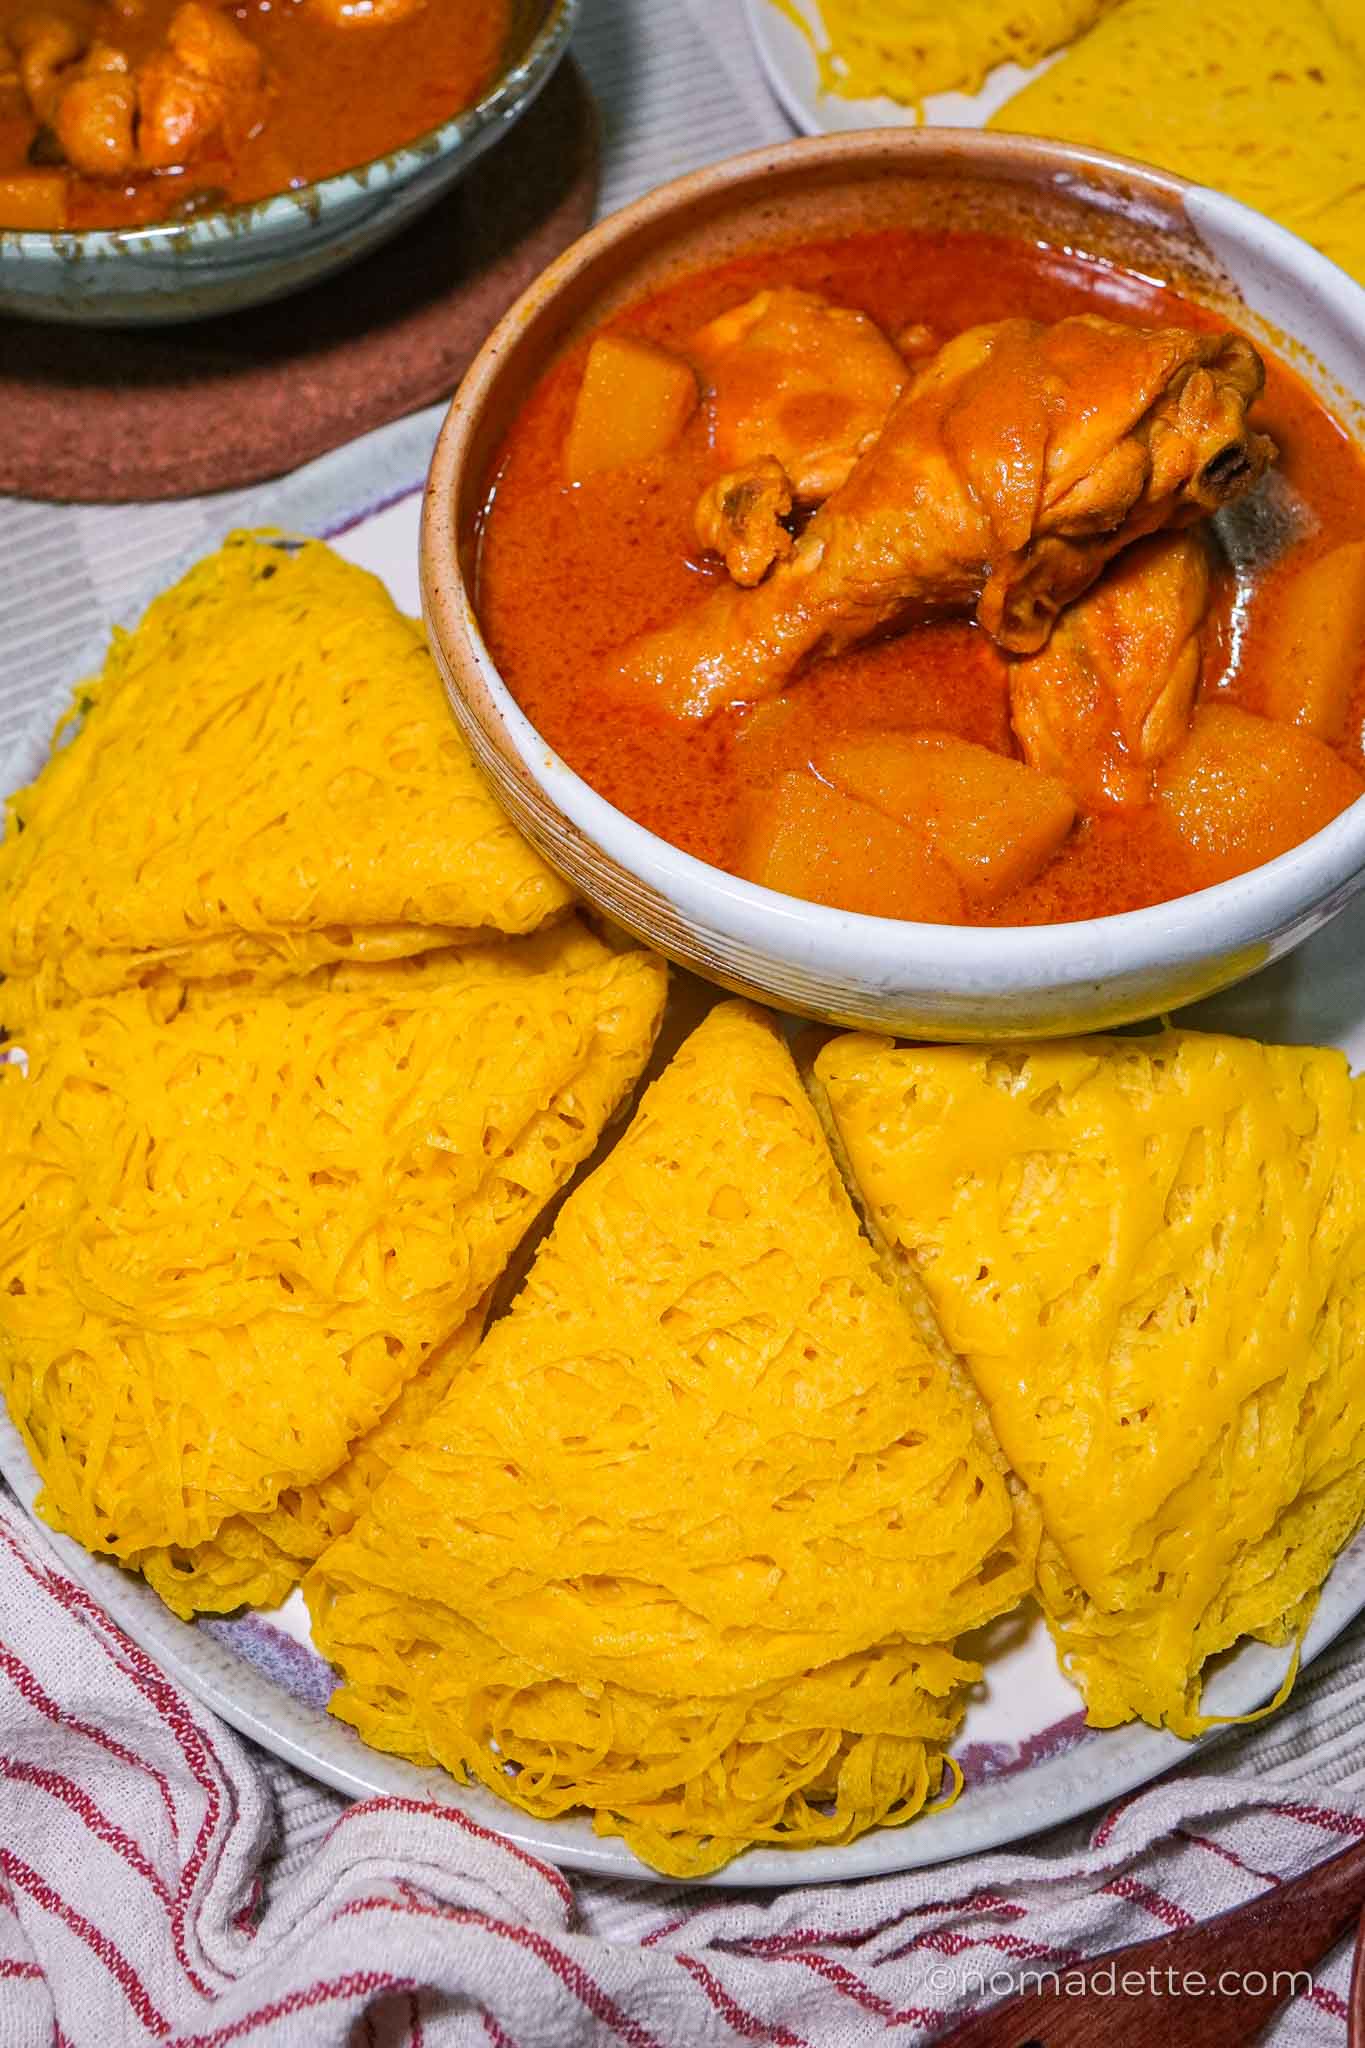
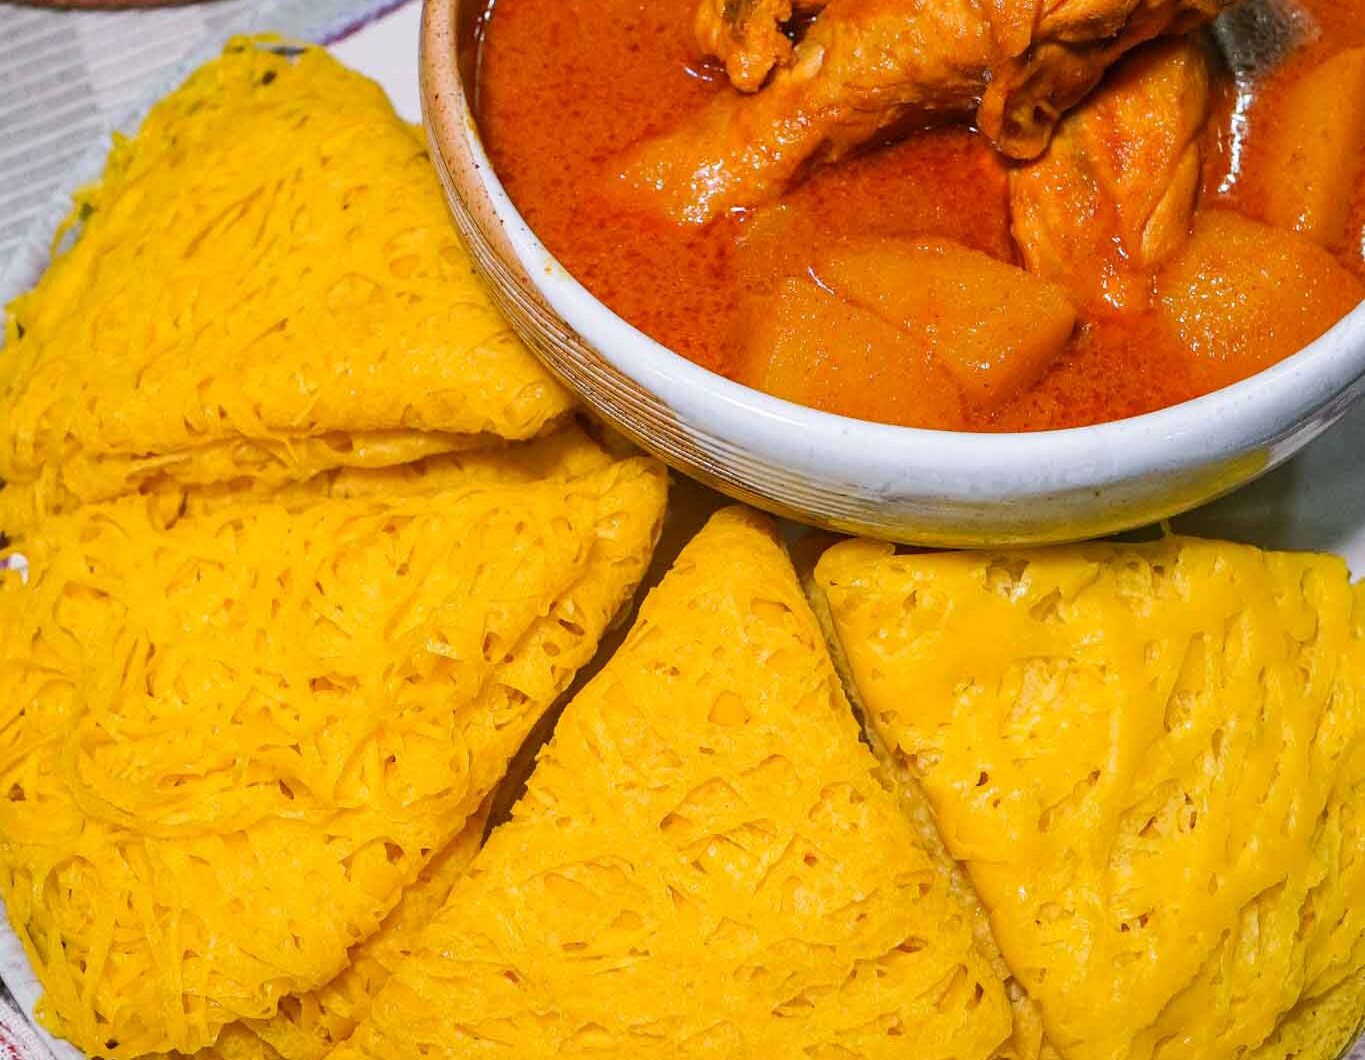
This easy roti jala recipe is a Singapore and Malaysian favourite! Soft, lacy pancakes (no coconut milk!) – perfect for soaking up your favourite curry.
This is the recipe so many of you have been waiting for!
Roti jala (roti kirai / roti renjis) has always been one of my favourite childhood meals… and my mom makes the best version! I still remember standing in the kitchen, watching her cook, getting excited the moment I saw those delicate yellow lacy edges form on the pan. Then she’d fold them up so neatly, stacking them into soft, warm bundles ready for curry.
When I finally asked her for the recipe, I was so surprised at how simple it was. The ingredients? Minimal. The method? Even simpler. And this part really caught me by surprise… she doesn’t use any santan (coconut milk) or milk at all.
Another thing she does? She blends everything in a blender. No whisking, no worrying about lumps, just smooth batter, every single time.
Jump to Recipe
What is Roti Jala?
Roti kirai, more commonly known as roti jala, is a soft, lace-like crepe traditionally served with curry.
- “Roti” means bread
- “Jala” / “Kirai” refers to a net or mesh
In English, it’s often called net pancakes or lacy pancakes, because of the intricate web-like pattern created when the batter is drizzled onto a hot pan.
Roti jala is widely enjoyed in Malay cuisine, and is especially popular in Malaysia, Singapore, and supposedly parts of Indonesia (although I’ve not come across it just yet). It’s often served during festive occasions like Hari Raya, but it’s just as commonly enjoyed as an everyday comfort meal at home.
Unlike thicker flatbreads, roti kirai is intentionally light and delicate. The lacy structure isn’t just for looks. It’s designed to trap and absorb curry, making every bite full of flavour.
Traditionally, the batter is poured through a special mould with multiple holes to create that signature net pattern, though today you’ll sometimes see it made with squeeze bottles specially made for roti jala.
Why You’ll Love This Recipe
Key Ingredients
- All-purpose flour: Forms the base of the batter and gives structure to the roti.
- Egg: Adds richness and helps create a soft, flexible texture.
- Water: Creates the thin, pourable batter needed for that lace pattern.
- Turmeric powder: Gives the roti its signature yellow colour and a subtle earthy flavour.
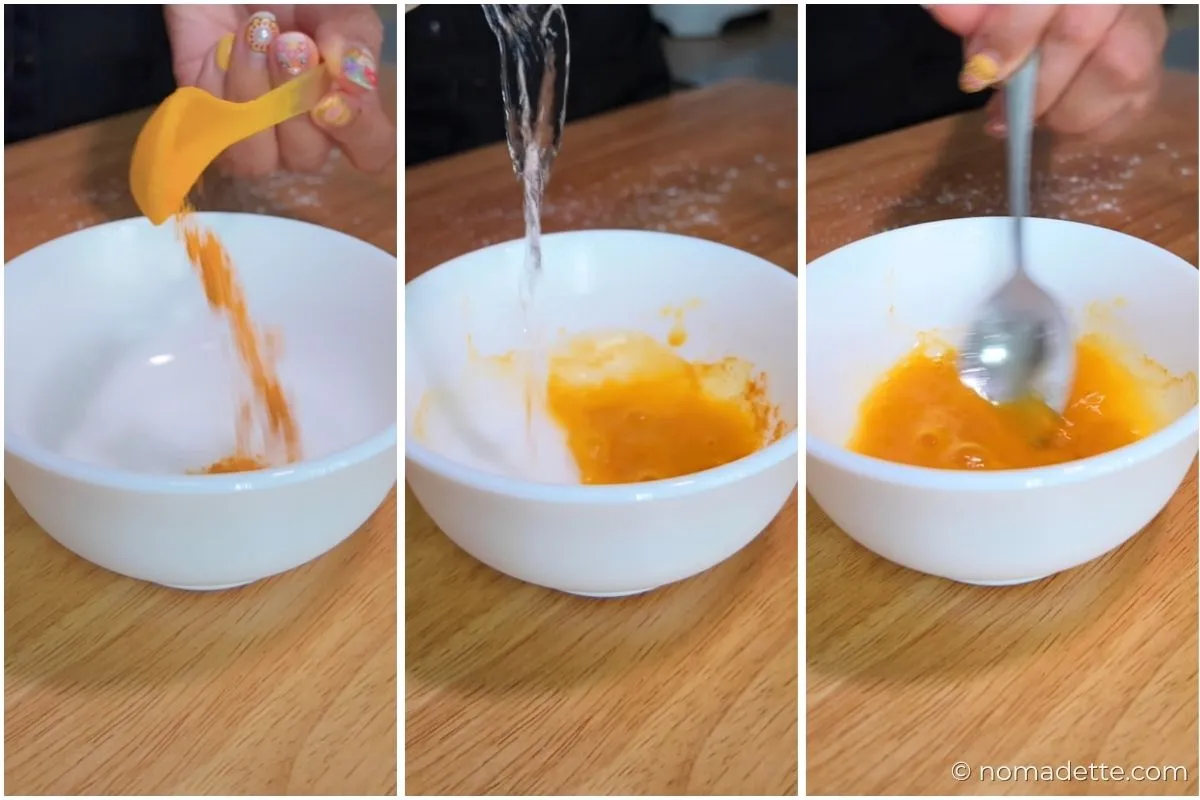
Tip
Dissolve the turmeric in a bit of water first to distribute it evenly and prevent clumps. Use sparingly — too much can overpower the flavour.
Another trick my mom likes to use is adding a bit of food colouring for a more vibrant yellow. Personally, I find it unnecessary since turmeric already gives a beautiful natural colour.
Optional Ingredients
My mom keeps it simple, and so do I.
I’ve tried versions with santan (coconut milk), and while they’re slightly softer and slightly more fragrant, I found them unnecessarily rich. Since you’ll be dipping the roti into curry anyway, that richness gets lost.
I much prefer this lighter version without santan. It lets the curry shine while being less greasy.
You can also use evaporated milk for a softer roti jala… but again I found it unnecessary.
The biggest plus point with keeping the batter simple? It lasts longer!
If you want to add santan or milk, all you do is cut the water in half and replace with the santan or milk.
For eg: instead of using 1 cupwater, you’d use:
- 1/2 cup water
- 1/2 cup santan or evaporated milk
Key Equipment
Blender
- The easiest way to get a perfectly smooth, lump-free batter in seconds!
Mixing bowl + whisk (or spatula)
- For the traditional method, if you prefer to mix by hand. You may need to sift flour and/or run the batter through a strainer to prevent lumps.
Nonstick pan
- Helps the roti release easily without sticking or tearing.
Oil brush or paper towel
- For lightly greasing the pan without over-oiling.
Roti Jala Mould
- Essential for creating the signature lace pattern.
Choosing the Right Mould (And Easy Substitutes)
- Traditional mould (multi-spout scoop)
- This is the one my mom still owns (20 years old!) and uses: a scoop with multiple small holes at the base.
- It gives you that classic net pattern quickly, but I personally found it quite messy and harder to control. The batter tends to flow out all at once, so you need a steady hand and some practice.
2. Roti jala squeeze bottle (multi-nozzle)
My preferred method! This is the squeeze bottle specifically designed for roti jala — it has multiple nozzles, not just one.
This is honestly the best of both worlds:
- More control than the traditional mould
- Still creates multiple thin strands at once
- Faster and more consistent patterns
- No mess!
3. Regular squeeze bottle (single nozzle)
If you can’t find the multiple-nozzle version, a regular squeeze bottle for sauces works too.
The difference is:
- You’ll only get one stream of batter at a time
- You’ll need to move your hand more to build the lace pattern
It takes slightly longer, but it actually gives you more control, which can be great if you’re just starting out.
Key Steps to Making Roti Jala / Roti Kirai
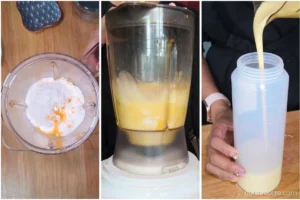
1. Blend until smooth
- Combine all ingredients in a blender.
- Blend for about a minute until you get a completely smooth, lump-free batter. Do not blend for too long as it can overwork the gluten.
- The batter should be smooth and pourable, like thin pancake batter or heavy cream. This is what allows it to form that delicate net design.

2. Rest the batter & transfer to mould
- Let the batter rest for 10–15 minutes (or while you prepare the pan).
- Pour it into your roti jala mould.
3. Prepare the pan
- Heat a nonstick pan over medium-low heat.
- Lightly grease pan.
- Use a paper towel or brush to swipe on a thin layer of oil.
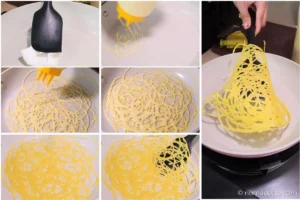
4. Drizzle the lace pattern (most important step)
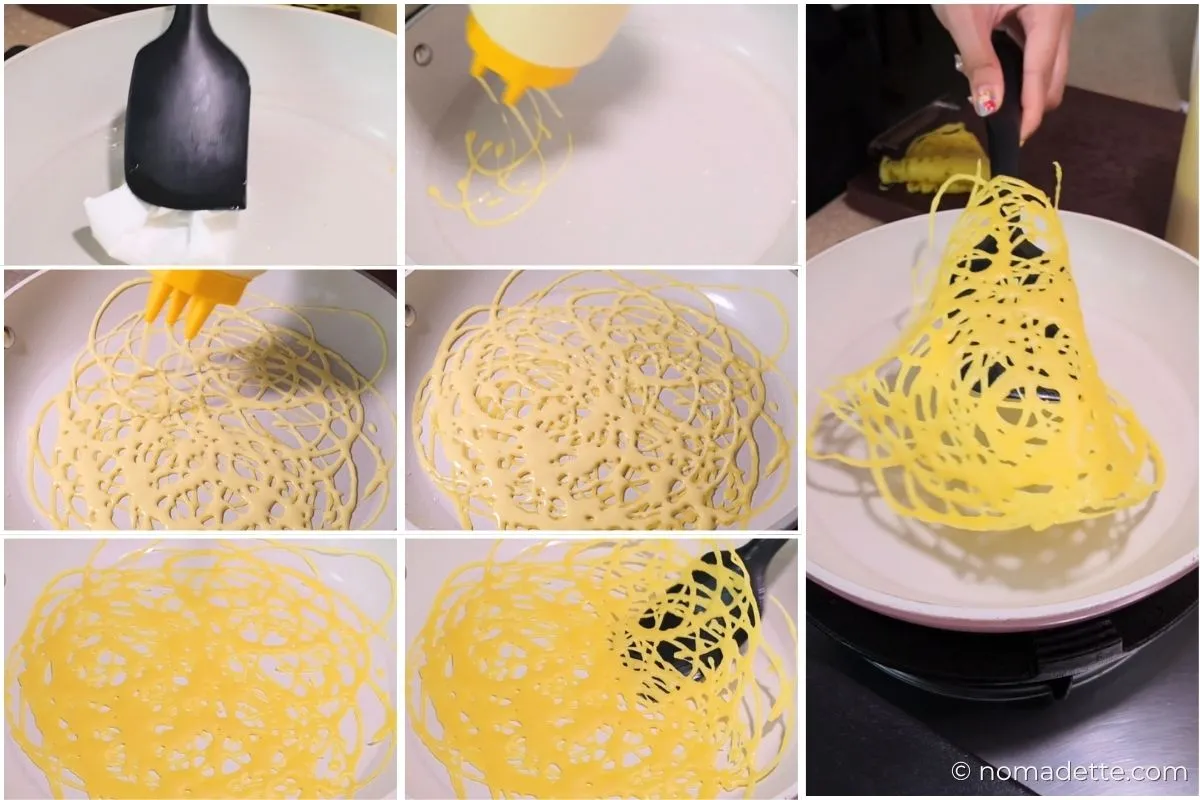
- Squeeze Bottle: Flip the bottle over the pan and gently squeeze to release the batter. Drizzle in a continuous circular motion.
- Traditional mould: Scoop batter with the mould, rest it on a plate or bowl to hold drippings. Hold the mould slightly above the pan and drizzle the batter in a continuous circular motion.
- Move your hand quickly and confidently
- Layer lines over each other to form a net
- Don’t overthink the pattern, it doesn’t need to be perfect!
- Keep the flow steady so the lines are thin and even
5. Remove from pan
- Cook for about 45–60 seconds, until the top is fully set. There should be no wet batter.
- The bottom should also release easily.
- No flipping needed.
- Remove from the pan and place on a plate.
- Repeat step 4.
- Layer the second pancake over the first.
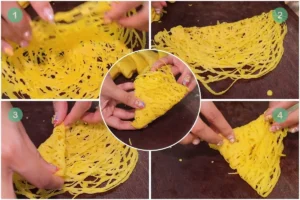
6. Fold or roll

- Start with two layers of roti jala, stacked over one another.
- You can also just use one layer – but we generally work with two layers per roti jala.
Option 1: Triangle fold

- Fold in half.
- Fold again to form a triangle.
- I like to fold it twice for a slightly smaller, thicker roti, but you can fold it just once and call it a day.
Option 2: Roll
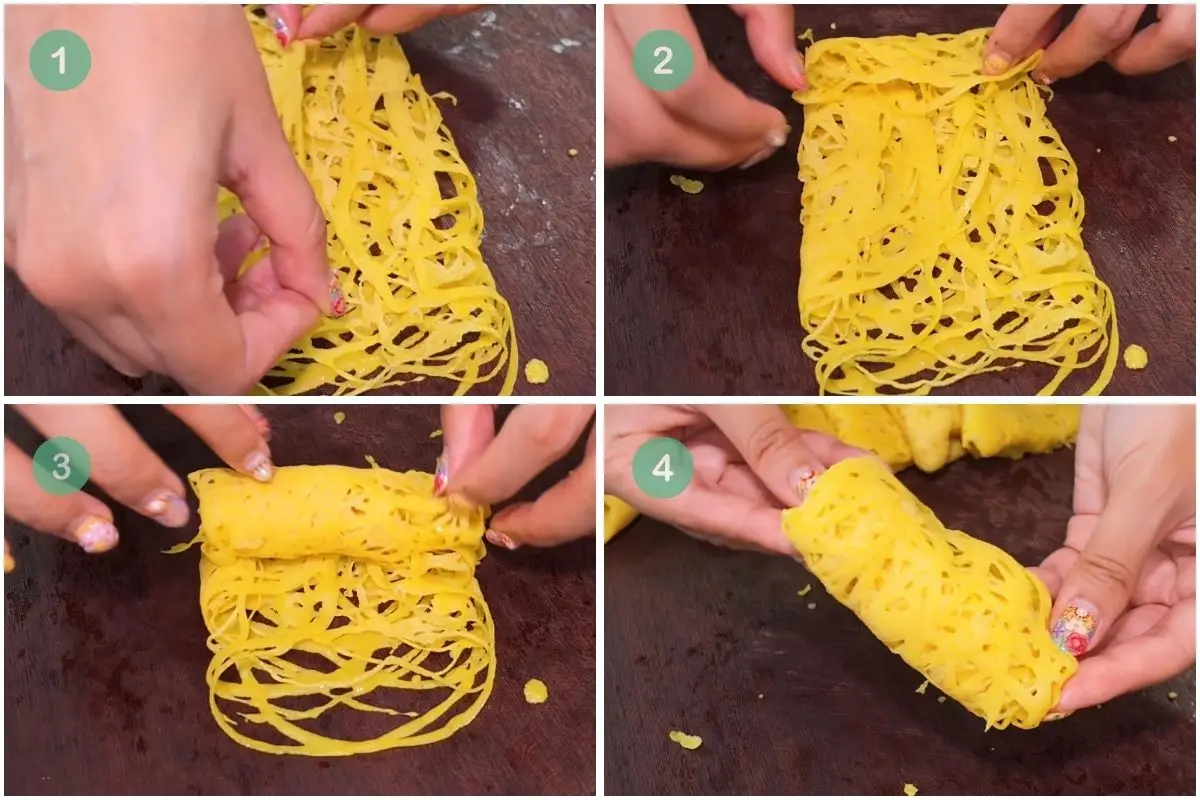
- Fold in the sides first to form a loose rectangle.
- Roll it up gently into a loose cylinder.
7. Serve and enjoy
- Serve warm with curry and dip generously.
- Enjoy!
How to Serve
Roti jala is best served warm with curry.
Some popular pairings:
- Singapore Curry Chicken (with curry powder)
- Kari Ayam
- Beef curry
- Dal or lentil curry
Serving Size
This batch (2 cups flour) makes about 12–14 double-layered roti jala, enough to serve 3–4 people as a meal.
If serving as a snack or appetiser, plan for 1–2 double-layered roti jala per person. As a meal, aim for 3–4 per serving.
Tips & Tricks
Storing & Reheating
To store
- Keep in an airtight container in the fridge for up to 2–3 days
- Roti Jala is not suitable for freezing.
To reheat
- Steam for a few minutes until soft
OR
- Microwave covered with a damp paper towel for 20–30 seconds
- Avoid reheating uncovered, as the roti can dry out.
Roti Jala (Roti Kirai) – Lacy Net Pancakes
4
servings5
minutes30
minutesThis easy roti jala recipe is a Singapore and Malaysian favourite! Soft, lacy pancakes (no coconut milk!) – perfect for soaking up your favourite curry.
Keep the screen of your device on
Ingredients
2 cup (125–140 g) all-purpose flour
2 cup (240 ml) water
2 egg
1 teaspoon salt
1 teaspoon turmeric powder
neutral oil, for greasing
Directions
- a. Prepare Batter (Blender Method)
- Add all ingredients to a blender.
Optional: Dissolve turmeric powder in 1-2 tablespoons of water for a smoother batter and more even colour. - Blend for about 1 minute until completely smooth and lump-free.
Batter should be smooth and pourable, like thin pancake batter or heavy cream. Adjust with a little water (to loosen) or a small amount of flour (to thicken) until you get a steady drizzle. - b. Prepare Batter (Hand Whisk Method)
- In a bowl, whisk together egg and water.
- Gradually sift in flour while whisking.
- Add salt and turmeric. Optional: dissolve turmeric powder in 1-2 tablespoons of water first.
- Whisk until smooth and lump-free.
Batter should be smooth and pourable, like thin pancake batter or heavy cream. Adjust with a little water (to loosen) or a small amount of flour (to thicken) until you get a steady drizzle. - Drizzle Lace Pattern
- Let batter rest for 10–15 minutes, or while you prepare the pan and cooking area.
- Drizzle batter onto the pan in a circular lace pattern:
– Squeeze bottle: Flip over pan and gently squeeze while moving in a continuous circular motion.
– Traditional mould: Fill mould, rest briefly on a plate to catch drips, then drizzle over pan in a circular motion. - Heat a nonstick pan over medium-low heat.
- Lightly grease with a thin layer of oil using a brush or paper towel.
- Cook and Remove
- Cook for 45–60 seconds, until the top is fully set (no wet batter). The bottom should also lift at the edges, and release easily from the pan. There is no need to flip the pancakes.
- Remove and place on a plate.
If there’s any excess batter on the pan, wipe it off with a paper towel to keep the surface clean before adding the next layer. I like to keep a small bowl nearby to catch any drips or leftovers as I cook. - Repeat with a second lacy pancake. Layer it on top of the first pancake.
- Fold or Roll
- Start with 1–2 stacked pieces.
I recommend 2 layers for a softer, slightly thicker bite, but you can use just 1 layer if you prefer, it will simply be thinner.
– Triangle fold: Fold in half, then fold again into a triangle.
– Roll: Fold in the sides, then roll into a loose cylinder.Loading gallery media… - Serve
- Serve warm with curry and dip generously. Eat!


Notes
- This batch (2 cups flour) makes about 12–14 double-layered roti jala, enough to serve 3–4 people as a meal.
- Batter should be smooth and pourable, like thin pancake batter or heavy cream.
- Stir batter occasionally as it may settle.
Did you make this recipe?
Tag @nomadetteats on Instagram


%20–%20Lacy%20Net%20Pancakes)