

I’ve tried every method — this is the only roast chicken that never fails! Brined, air-fried, and guaranteed juicy every time.

This Air Fryer Roast Chicken has become one of my FAVOURITE GO-TO dishes! If you’re looking for an effortless, healthy way to make delicious roast chicken, then this is IT. I use to get intimidated cooking a whole roast chicken. The steps, the ingredients, the meticulousness… I have to psyche myself out before I start. Until I started making it in the air fryer!
SO this really is the only way I make a whole roast chicken now. The air fryer just does it better — faster, crispier, juicier, and so ridiculously hands-off that I’ve served this to guests before and no one even realised it came out of the air fryer. I was literally hosting while the chicken cooked itself.
And I love making a whole chicken because I can stretch it into so many meals. Night one, I’ll serve it with roast veggies (which I throw into the air fryer at the same time), and the leftovers (if there are leftovers) become the easiest protein for rice bowls, noodles, wraps… whatever I’m craving. And you know how much I love “make once, use for days” type of meals!
But here’s my one real game changer: I brine the chicken first. I absolutely cannot stand dry chicken… and brining is the only foolproof, consistent method that gives me juicy, flavourful meat every single time. Once you try it, you’ll never go back.
I’m also sharing a few spice mix options below so you can switch up the flavour however you like. But honestly? Thanks to the brine, even just salt and pepper will give you a crispy, juicy, ridiculously good roast chicken. Minimal effort, maximum payoff — my favourite kind of cooking!
Jump to Recipe
Why You’ll Love This Air Fryer Roast Chicken
Why Brine the Chicken First

This is how serious I am. I will die on this hill: for the BEST air fryer roast chicken, brine it. It’s the one step that makes all the difference — especially if you’re as anti-dry-chicken as I am.
Here’s what brining does:
- Keeps the chicken juicy.
The saltwater solution hydrates the meat so it stays moist while cooking. Even the breast meat stays tender and succulent.
- Makes it taste SO much better.
Salt doesn’t just sit on the surface — it works its way inside the chicken, seasoning it all the way through. No bland chicken here. You can also add herbs, spices, garlic, peppercorns, or citrus to the brine for extra depth.
- Helps it cook more evenly.
Brining hydrates the meat throughout, which means you get fewer dry patches and a more consistently cooked bird.
- Can even shorten the cook time.
Because brined chicken retains moisture better, it tends to cook a bit faster and stays tender even if you slightly overcook it.
- It guarantees better results overall:
If you want foolproof, consistently juicy roast chicken every time, brining is the one step that makes the biggest difference with the least effort.
Once you try brining, you honestly won’t go back — it’s the easiest upgrade that gives you roast-chicken-level flavour and rotisserie-level juiciness with almost zero extra effort.
How to Make a Basic Brine
Brining a chicken is honestly one of the easiest ways to guarantee juicy, flavourful meat. All it takes is a saltwater soak, and you’re done. Here’s my simple method that’s easy to remember and perfect for home cooks.
What You’ll Need
- Whole chicken: Cleaned and ready to cook, usually labelled “griller” or “roaster.”
- Salt: Use sea salt, himalayan salt or coarse cooking salt (also known as kosher salt), basically coarse, larger salts — avoid fine table salt.
- Water: Enough to fully submerge the chicken.
- Container or pot: Big enough for the whole chicken without overflowing. Recommended to not use a too-big pot either, but in my experience too-big is better than too-small!
- Lid or heavy plate: To keep the chicken fully underwater.
Simple brine ratio:
- 1 cup water → 1 tablespoon salt
- Scale up depending on how much water you need to cover the chicken.
Instructions
1. Make the brine
- In a large pot or container, combine the water and salt. Stir until all of the salt dissolves. You can use warm water to properly dissolve the salt, but make sure the brine solution is completely cool before adding the chicken in. Adjust the amount of water and salt required according to the size of your container. Add a little less water than you think you need to avoid overflowing when you add the chicken in!
2. Prep the chicken
- Rinse the chicken under cold water.
3. Submerge
- Place the chicken in the brine, breast side down. Use a plate or lid to weigh it down so it’s fully covered.
4. Chill time:
- Refrigerate for 4–6 hours.
- If you want to brine longer, reduce the salt slightly.
- Avoid brining more than 24 hours, it can get too salty.
5. Rinse & dry:
- Remove the chicken, rinse briefly under cold water, and pat completely dry with paper towels.
- Dry skin = crispier skin in the air fryer.
Optional Brine Flavour Boosts
While the basic saltwater brine is more than good enough, occasionally I like to add herbs and aromatics to my brine.
How? Heat aromatics with water to release flavour, and until all the salt has melted. Just a quick 5 minute simmer over the stovetop will do.
You can add crushed garlic, onions, dried herbs, bay leaves, peppercorns… possibilities are endless!
How to Make Air Fryer Roast Chicken
1. Make the Brine and Brine Chicken

- In your container or pot, dissolve salt in water. Use the approximate ratio 1 tbsp salt per cup (240 mL) water. Optionally use warm water to dissolve salt faster, but let the brine cool completely before adding chicken.
Tip
Do not fill the container all the way up with water! It will definitely overflow when you add the chicken later on. You can measure the displacement beforehand, but I can never be bothered – fill the container just halfway through and you should be good.
- Then give chicken a rinse and gently lower in brining container to submerge in the brine, breast side down. Cover with a lid or a plate to ensure chicken stays submerged.
- Refrigerate for 4-6 hours, or overnight. Do not leave it in for longer than 8-12 hours to prevent over-salting. Option to flip the chicken over halfway through, though the most important part to brine is the breast side.
2. Prepare Chicken

- Once chicken has brined, take it out of the refrigerator.
- Remove chicken from brine and give a rinse under water to remove any excess salt. Pat chicken dry with paper towels.
3. Season Chicken

- Preheat the Air Fryer at 180°C/350°F for 5 minutes.
- Meanwhile, combine the ingredients together for your seasoning and keep it to one side. You can even just do a salt and pepper coating and it can work!
- Spray or brush chicken with oil. Alternatively you can also add oil to the seasoning powder mix to create a paste. I prefer the spray or brush method because I can use just the right amount of oil needed to make the seasoning stick.
- Add seasoning and coat chicken liberally on both sides.
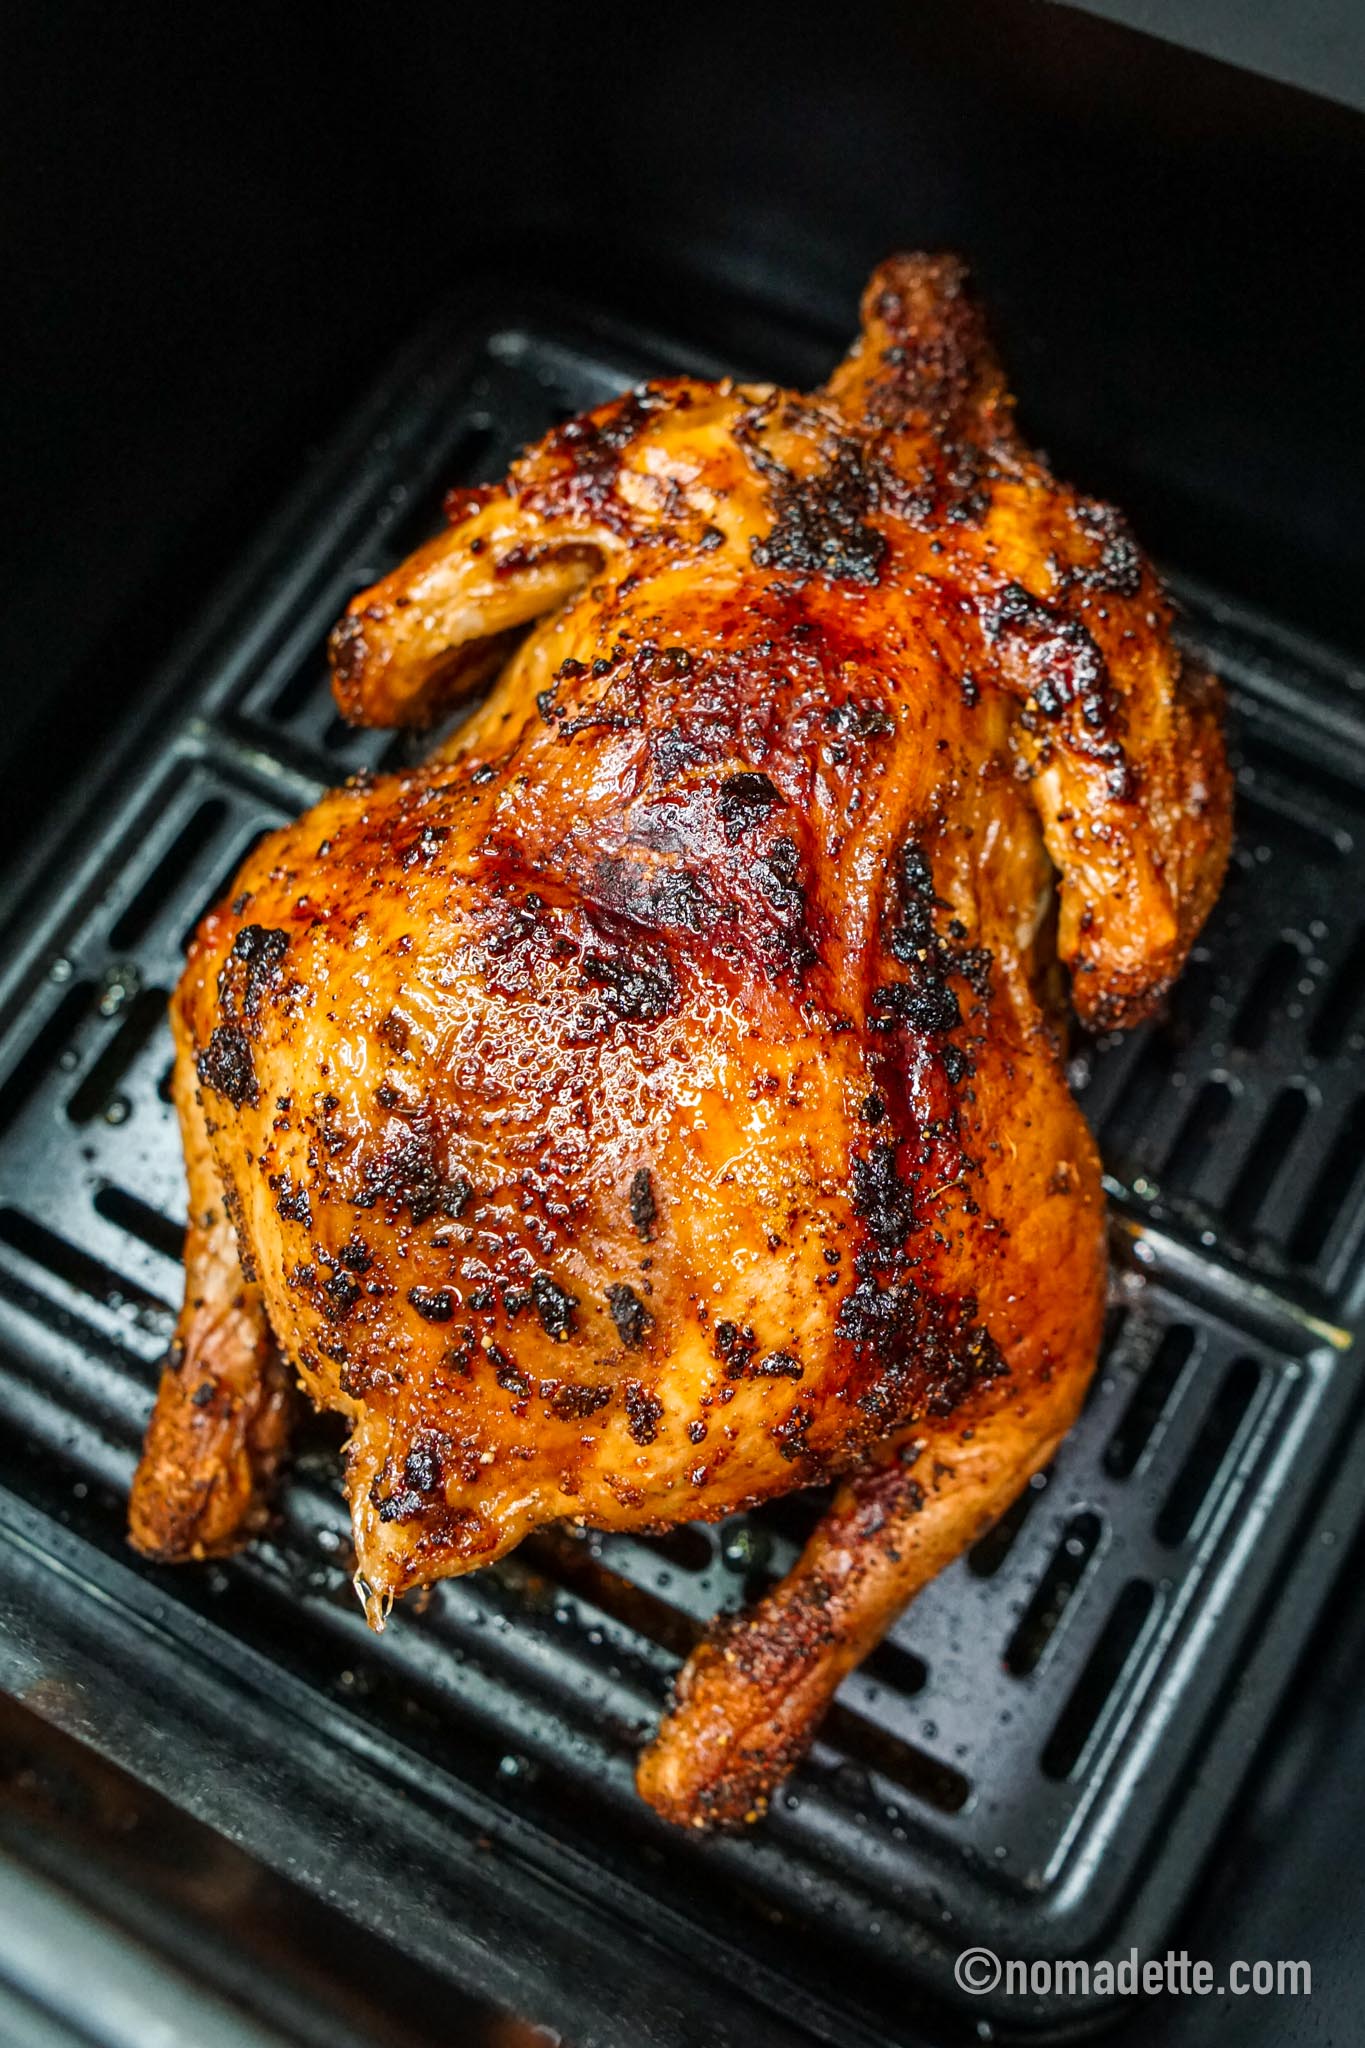
4. Air Fry Chicken

- Place coated chicken on the rack.
- Air fry for 40 to 45 minutes. The timing may depend on air fryer and your chicken size, but this is a good indication to start from. The chicken used in this recipe is rather small at 1kg, but it’s the perfect size for my air fryer.
5. Remove Chicken from Air Fryer and LET REST
- Check that chicken is cooked through, by poking a meat thermometer at the thickest part and check that the internal temperature is 73°C/165°F.
- Let the chicken rest for 10 minutes, before serving. This is essential to retain as much moisture in the chicken post-air fry. Option to cover the chicken with aluminium foil, so moisture does not escape and chicken stays moist – but I find this step unnecessary as long as you do not air fry for too long.
- Carve and serve.
Spice Combos to Try
After brining, the next step is flavour!
Here are some of my favourite spice mixes — all with measurements so you can easily mix and match:
1. ‘Ayam Goreng’ Spice Mix (my FAVE!)
- 1 tsp salt
- 1 tsp ground black pepper
- 1 tbsp coriander powder
- 1 tsp cumin powder
- 1 tsp fennel powder
- 1 tsp turmeric powder
- ½ tsp chilli powder (adjust to taste)
- 1 tsp garlic powder
- 1 tsp onion powder
2. Traditional Herb Mix
- 1 tsp dried rosemary
- 1 tsp dried thyme
- 1 tbsp garlic powder
- 1 tbsp onion powder
- ½ tsp salt
- 1 tsp black pepper
3. Smoky Paprika
- 1 tsp salt
- 1 tbsp smoked paprika
- 1 tbsp garlic powder
- 1 tbsp onion powder
- 1 tsp ground black pepper
4. Chinese Five-Spice
- 1 tsp salt
- ½ tsp black pepper
- 1 tsp garlic powder
- 1 tbsp Chinese five-spice powder
How to Apply Your Spice Mix
- Pat your brined chicken completely dry.
- IMPORTANT: Drizzle lightly with oil or butter. Some fat will crisp up the skin, but not burn the spices.
- Rub your chosen spice mix evenly over the chicken, including under the skin if possible.
- Air fry as per recipe instructions.
How to Serve Your Air Fryer Roast Chicken
Once your chicken is perfectly brined, spiced, and air-fried, the serving possibilities are endless! Here are some ideas to make the most of your roast chicken night:
- Classic Roast Dinner:
Serve with roasted or steamed vegetables, mashed potatoes, or a simple salad for a comforting, fuss-free meal.
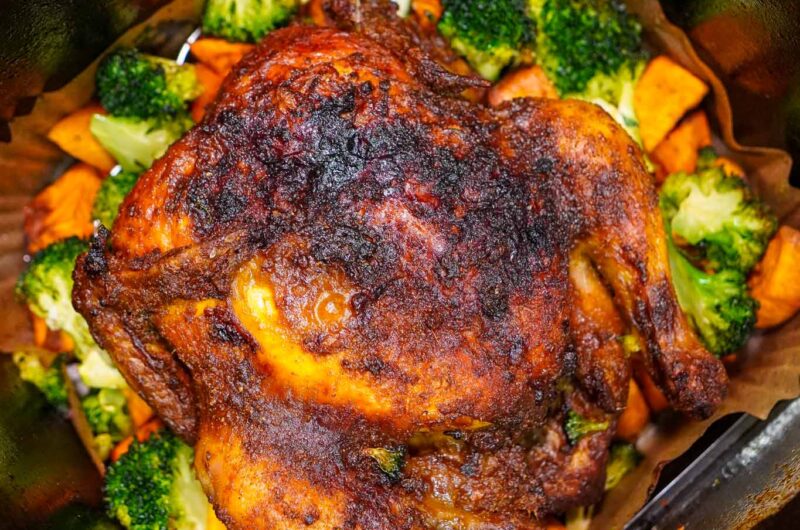
- Roasted Vegetables (Air Fryer-Friendly):
– Make it a full air fryer meal by roasting your vegetables while the chicken rests. You can also toss in the vegetables at the last 15 minutes of cooking.
– My favourites: broccoli, carrots, cauliflower, and bell peppers. Cut into bite-sized pieces, toss with olive oil, salt, and pepper, and air fry at 180°C / 350°F for 15 minutes.
- Rice:
Pair with simple or flavourful rice dishes for a satisfying, hearty combo. How about a side of easy Garlic Butter Shrimp Fried Rice?
- Pasta:
Whip up a quick pasta while the chicken cooks! Try this rice cooker mac & cheese, one-pot spaghetti and meatballs, shrimp rose pasta, or one-pan cheeseburger pasta.
- Dipping Sauces:
– Take your chicken to the next level with a sauce on the side. If you’re up for it, serve it with some spicy, tangy Thai-style Nam Jim Jaew dipping sauce!
– Other sauces that I love with this: sambal, chicken rice sauces, garlic yoghurt sauce, Sambal Matah, spicy sriracha mayo, and in a pinch, any bottled chilli sauces!
What to Do With Leftovers (Stretch Your Roast Chicken!)
One of the best things about a whole chicken is that it keeps giving!
Here’s how to make your leftovers go further:
- Shred for Quick Protein: Pull apart leftover chicken and use it in salads, grain bowls, wraps, or noodles. It’s an easy way to add flavourful protein without extra cooking.
- Rice Bowls: This is one of my go-to lunches: shredded chicken, over rice, veggies, an a side of sambal.
- Make Chicken Stock: Save the carcass and any leftover bones in the freezer. Use them later to make homemade stock!
- Sandwich & Wraps: Mix shredded chicken with mayo, yoghurt, or a little pesto for a quick wrap filling.
- Freezer-Friendly Portions: Portion leftover meat into freezer bags for easy weeknight meals — they reheat quickly and save you cooking time.
Tip
Store leftover chicken in an airtight container in the fridge for up to 3–4 days. Bones for stock can go in the freezer for months.
FAQ: Air Fryer Roast Chicken
Q: Can I use my oven instead of an air fryer?
Yes! You can absolutely roast your chicken in the oven. Preheat to 200°C / 400°F and roast a whole chicken for about 50–60 minutes, or until the internal temperature reaches 165°F / 74°C. Brining and spice rubs work exactly the same way — the oven just takes a little longer than the air fryer.
Q: How long can I brine the chicken?
For a whole chicken, 4–6 hours is ideal. You can brine even up to 24 hours for deeper seasoning, but avoid longer than that as it may become too salty. Besides that, it’s very forgiving!
Q: Can I use table salt instead of sea salt?
You can, but I don’t recommend it. Table salt is finer and can oversalt the chicken quickly. Sea salt or coarse cooking salt gives more control and a more even seasoning.
Q: Do I need to oil or baste the chicken while cooking?
Nope! Thanks to brining, your chicken will stay juicy without basting. A light drizzle of oil or butter before cooking is required though, otherwise the spice rub can burn easily.
Q: Can I make the chicken ahead of time?
Yes! You can brine the chicken ahead and store it in the fridge until you’re ready to cook. Cooked chicken can be stored in an airtight container in the fridge for 3–4 days, and leftover bones can be frozen for homemade stock.
Q: What if I don’t have any spices at home?
Don’t worry — just salt and pepper alone will give you a crispy, juicy, and delicious chicken thanks to the brine. It’s the easiest foolproof way to get great results.
Q: Can I use this method for chicken parts instead of a whole chicken?
Yes! Brining works just as well for chicken thighs, drumsticks, or breasts. Adjust air fryer or oven cooking times based on the size and cut.
Q: How do I know when the chicken is done?
The safest way is to use a meat thermometer: 165°F / 74°C in the thickest part of the breast. The juices should run clear when pierced.
Air Fryer Roast Chicken Recipe (with brine)
4
servings15
minutes45
minutesKeep the screen of your device on
Ingredients
- Chicken & Brine
1 whole chicken (about 1-1.2 kg), cleaned
2 cups water (adjust according to brining container)
2 tbsp salt (or follow 1 tablespoon salt per cup of water ratio)
- Seasoning
1 tsp salt
1 tsp ground black pepper
2 tbsp olive oil (or enough to lightly coat chicken)
- Equipment
air fryer
Container or pot for brining
lid or heavy plate to keep chicken submerged
meat thermometer (optional)
Directions
- Brining the Chicken
- In your container or pot, dissolve salt in water. Use the approximate ratio 1 tbsp salt per cup (240 mL) water.
Optionally use warm water to dissolve salt faster, but let the brine cool completely before adding chicken. - Rinse the chicken, then carefully submerge in the brine. Ensure it is fully covered. Use a lid or heavy plate to keep it submerged.
- Refrigerate for 4–6 hours or overnight (maximum 8-12 hours). Longer may result in slightly salty meat.
- After brining, remove chicken from the brine. Pat skin dry with paper towels. Dry skin = crispier roast!
NOTE: Let the chicken sit at room temperature for 10–15 minutes before cooking. This prevents it from being shocked by the heat and helps it cook more evenly. - Seasoning & Air Frying
- Preheat your air fryer to 180°C / 350°F.
- In a small bowl, combine seasoning ingredients.
- Lightly brush or spray chicken with oil. Alternatively, mix oil with seasoning to make a paste.
- Rub seasoning evenly over the chicken. You can rub it under the skin if possible, but I rarely do this unless the skin has naturally lifted.
- Place chicken in the air fryer basket or rack, breast side down. Cook for 40–45 minutes, depending on air fryer model and chicken size.
Optional: Flip halfway through cooking for even browning. - Checking Doneness & Resting
- Use a meat thermometer to check the thickest part of the breast: 73°C / 165°F. Juices should run clear.
- Let chicken rest for 10 minutes before carving or serving. Enjoy!
Did you make this recipe?
Tag @nomadetteats on Instagram


)