

How to make Muah Chee, or glutinous sticky rice balls coated with a sweet crushed nuts topping easily in a rice cooker or microwave oven.
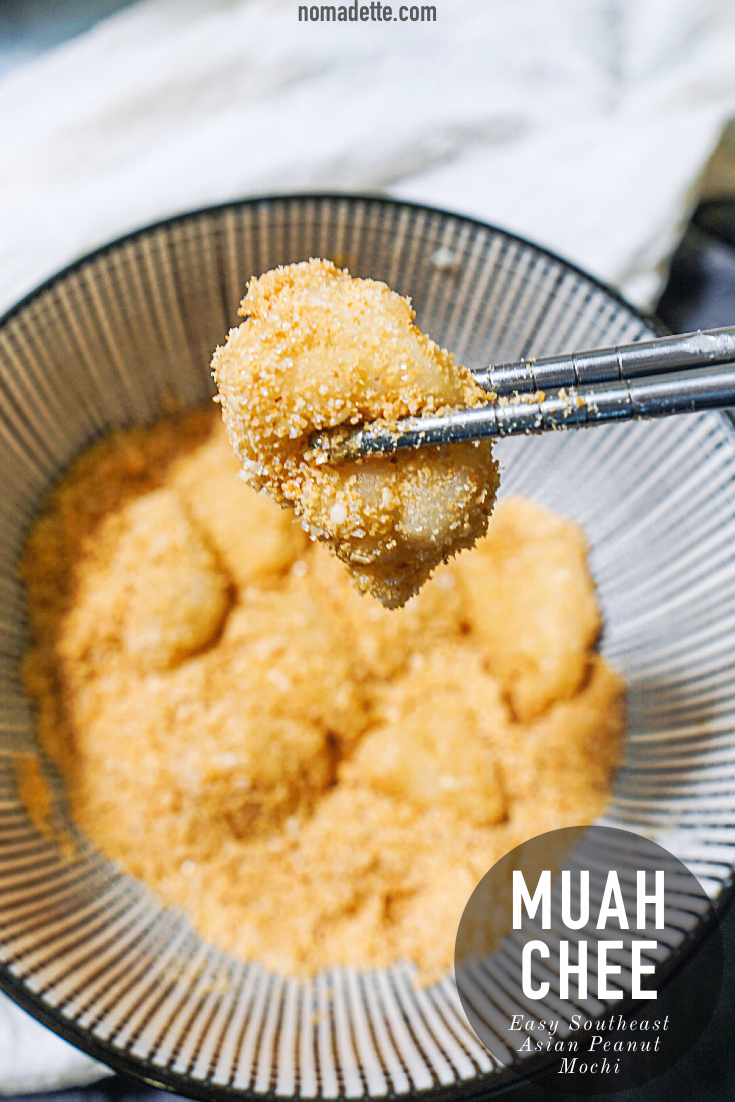
Muah Chee is a sticky, chewy glutinous rice balls tossed in a coating of crushed peanuts and sweet sugar. If you’ve had Japanese mochi, this is very similar albeit a more humble version of it. It is a tasty snack that I can easily buy for very, very cheaply. In Singapore I see it more often at pasar malams, but Muah Chee is a snack as well in Malaysia and Indonesia.
I’ve also seen this snack making an appearance in the streets of Bangkok even, although I’m not certain if it’s common local snack or just an easy regional import.
I made this some time back with a microwave, but forgot all about it… Until my recent obsession with my rice cooker had me chance upon this recipe by Leslie Koh. I gave it a go, and had so much fun recreating it! It also reminded me of a Muah Chee recipe I attempted a long time ago, using the microwave. It’s also an easy recipe, and if you don’t have a rice cooker, you can make Muah Chee in a microwave too.
This is an ultra simple recipe, with ingredients that you would have at home. Originally, the muah chee would have sesame oil and shallot oil stirred in for extra flavour and lusciousness. If you have sesame oil or shallot oil you can incorporate that easily in these recipes too.

What Rice Cooker to Use for Muah Chee?
Any rice cooker will do! I used a multi function rice cooker, also known as a Japanese rice cooker.
I used only the rice cooking setting, therefore any rice cookers can work. If your pot does not have a non-stick coating however, you might have a much meddlesome, sticky situation happening.
Easier Muah Chee Recipe: Rice Cooker or Microwave?
Either method requires a bit of experimenting, since all rice cookers and microwave are made differently. My recipe and directions are good bases to start from.
With the rice cooker, I indicated every 3 minutes, as per Leslie Koh‘s recipe. In reality, my muah chee required 4-minute intervals. In total, my cook time was about 12 minutes. The 3-minute cook time was a good base to start from however.

If there is any active effort for rice cooker muah chee, it would be the final folding of the dough to fully cook it. You would need to continuously fold the dough so it turns from a pasty white shaggy dough to a pale yellow sticky dough.
Personally I much prefer the rice cooker method, although the microwave is not that much harder. Rice Cooker wins simply because I don’t have to take the hot bowl in and out of the microwave each time. All I do is pop the lid open, give it a whirl, and pop the lid back on.
How to Make Crushed Peanuts
One of my luxuries of living in Singapore is that we have these sugared crushed peanuts easily available and ready for use at our local supermarkets. They are also so cheap that it’s just not worth buying peanuts and DIY-ing it myself.

If you don’t have this luxury though, making it is simple.
- Add roasted peanuts and sugar to a blender.
- Turn blender on, and blitz away to a fine powder! Easy. If you don’t have a strong blender, use a pestle and mortar. You want a fine powder for this.
I highly recommend getting the ready made roast peanuts (the kind your OG coffeeshop uncles snack on while watching soccer) which are cheap and widely available. Unsalted or salted, it doesn’t matter too much. In fact, salted ones would impart more flavour.
To one cup of peanuts, I would add about 2-3 tbsps of sugar. I don’t have a sweet tooth though; feel free to add more if you want aa sweeter blend. I also added sesame seeds in my coating, but this is optional.
By the way, don’t feel like you can only use peanuts. Use any of your favourite nuts! Hazelnuts or cashew nuts especially would be delicious.
Although crushed nuts are the traditional coating, try coating this with matcha powder for a Japanese mochi twist. I’ve also coated this in Instant Thai Milk Tea powder as well, to amazing results.
Handling the Sticky Muah Chee Dough
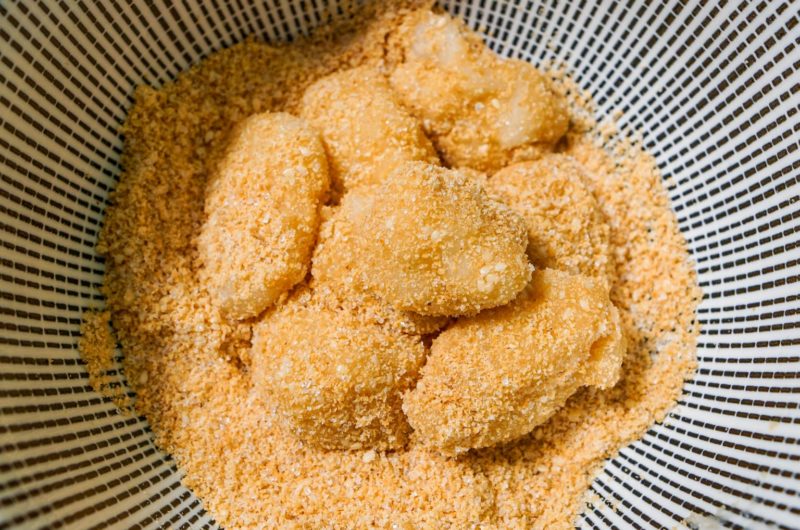
After a few (very messy) attempts, the easiest way to handle the muah chee dough is to simply scrape out a small piece and drop it straight into the crushed nuts bowl.
With a pair of scissors, snip at the dough to cut out chunks. Immediately roll the chunks in the crushed nuts, and it will stop sticking to each other immediately.

Use chopsticks to roll and handle the sticky chunks. I tried with tea spoons initially and the entire mass of dough would stick to the spoon.
Use a deep bowl, rather than a plate. I find it can be a messy process trying to coat the muah chee with the nuts. Rolling it around in a plate did not coat the muah chee as effectively as in a bowl – and was so messy! Not fun trying to clean off micro bits of nuts and sugar on the table afterwards.
Can these be kept?
These are best eaten immediately, but if you want to store them for later (or too full to finish it right now), here’s how.
Snip the dough into pieces and coat in the crushed nuts. Keep this at room temperature, and they will remain soft and gooey for a day. Do note that the crushed nuts and sugar coating will become slightly moist from the sugar exposure to air. It’s still good to eat though. If you’ve coated it, I would not recommend keeping for more than a day. The topping will turn mushy, on top of the muah chee hardening up.
You can’t quite keep the dough uncoated for long. A solid layer will form around it, rendering the surface not sticky at all. When this happens, two things you can do to revive it:
- Steam it to reintroduce moisture back into the muah chee.
- Place dough in microwaveable container and splash a bit of water on it. Pop it in the microwave on high for a minute. The dough should turn melty again.
- Simply cut away the outer layer. Only the surface that is exposed to air would have turned solid. Within is still soft and gooey sticky dough. Cutting it is a little tricky and messy, but I would rather grapple with it than prepare a whole other contraption to steam.
I would not recommend keeping it for longer. I stashed some leftovers in the fridge for about 3 days before rehydrating it in the microwave. The dough turned melty and gooey, however, it definitely was not as soft as Day 1. Instead it had a slight chewy bite to it. If you do not mind this, it was still good to eat.
More Recipes Like This:
If you like this dessert/snack recipe, you might like these too:
- Martabak Manis | Indonesian Sweet Thick Pancakes
- Nonya Rainbow Kueh Lapis | 9-layered steamed cakes
- Rice Cooker Mac and Cheese
Easy Muah Chee | Southeast Asian Mochi (Rice Cooker / Microwave)
2
servings5
minutes12
minutesKeep the screen of your device on
Ingredients
1 cup glutinous rice flour
1 cup water
1/4 tsp salt
1/2 tsp sesame oil (optional)
1/2 tsp shallot oil (optional)
1/4 tsp oil to coat pot
- Crushed Nuts Topping
1/4 cup crushed peanuts
1 tbsp sugar
1 tsp sesame seeds (optional)
Directions
- Rice Cooker
- Combine flour, water and salt to get liquid batter.
- Coat pot with oil and pour the batter in.
- Turn on rice cooker, and set a timer for 3 minutes.
- At the 3-minute mark, open the rice cooker and give mixture a stir. It should still be a liquid batter, but there should be some solidifying that’s already happening at the base.
- Cover the lid, and let cook for another 3 minutes. At the end of the 3-minute mark, open lid, and stir. The mixture should have more solid pieces than before, but still quite liquidy. Close back the lid and allow to cook for another 3 minutes.
- At the end of this 3-minute mark – giving the total cook time to be 9 minutes at this point – it should be more solid than before, with very little liquid remaining. This time round, stir and fold continuously until there is no liquid, and a sticky dough forms. Continue to fold and roll until the dough is fully cooked. The dough is fully cooked when it turns from a bright white shade, to a slightly translucent, very pale yellow.
- If using sesame oil and shallot oil, add at this point (I did not do this). Continue to fold until the oils disappear into the dough.
- In a deep bowl, add the crushed peanuts, sugar and sesame seeds, and stir to combine.
- Scoop out a small portion of the sticky rice dough, and drop straight into the bowl of crushed nuts. Use scissors to immediately cut into the dough into small chunks. Roll the chunks around in the crushed nuts.
- Serve immediately!
- Microwave
- Combine flour, water and salt to get liquid batter. If using sesame oil and shallot oil, stir it in at this stage as well.
- Coat microwave safe bowl with oil, and add the batter in.
- Pop in the microwave, and set it to cook on high for 3 minutes.
- At the 3-minute mark, take the bowl out. There should be some solidifying happening. Stir through and there should be a half solid, half liquid mixture forming in the bowl.
- Return back to microwave and cook for another 1 minute. At the end of the 1-minute, take out bowl and continuously stir and fold. A solid, sticky and cooked dough should start to form. If it is not cooked through (or the liquid is not disappearing into the hot dough, then continue returning to the microwave at 1-minute increments until the dough can form. This depends on the strength of your microwave.
- Scoop out a small portion of the sticky rice dough, and drop straight into the bowl. Use scissors to immediately cut into the dough into small chunks. Roll the chunks around in the crushed nuts.
- Serve immediately!
Did you make this recipe?
Tag @nomadetteats on Instagram


)